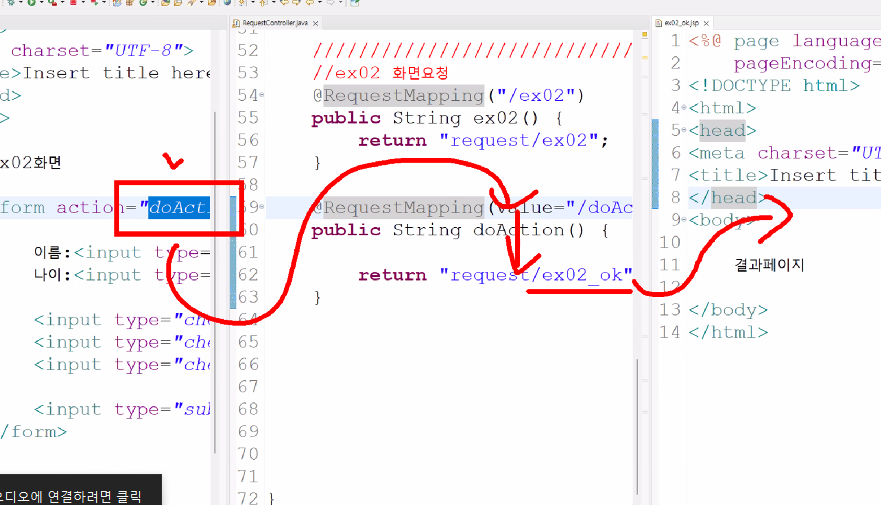
Spring스프링 MVC 객체구현 (@Controller) -(1)
1. @Controller, @RequestMapping 어노테이션을 이용한 URL맵핑
Spring-servlet 뷰 합성기 빼고 모두 주석 처리 한 후 main에 homecontroller 생성
1-1. 서버연결방법 (1)
Spring-servlet.xml
<?xml version="1.0" encoding="UTF-8"?>
<beans xmlns="http://www.springframework.org/schema/beans"
	xmlns:xsi="http://www.w3.org/2001/XMLSchema-instance"
	xmlns:mvc="http://www.springframework.org/schema/mvc"
	xmlns:context="http://www.springframework.org/schema/context"
	xsi:schemaLocation="http://www.springframework.org/schema/mvc http://www.springframework.org/schema/mvc/spring-mvc-3.1.xsd
		http://www.springframework.org/schema/beans http://www.springframework.org/schema/beans/spring-beans.xsd
		http://www.springframework.org/schema/context http://www.springframework.org/schema/context/spring-context-3.1.xsd">


	<!-- 디스패처 서블릿이 초기로 등록하는 설정 파일 -->

	<!-- 메인 컨트롤러를 빈으로 등록 -->
	<!--  <bean id="xxx" class="com.simple.controller.MainController" />  -->

	<!-- 핸들러 맵핑 등록 -->
	<!-- /test/aaa 요청이 들어오면 xxx bean으로 핸들러 맵핑을 시킨다. -->
	<!-- <bean
		class="org.springframework.web.servlet.handler.SimpleUrlHandlerMapping">
		<property name="mappings">
			<props> -->
				<!-- key에는 url 주소가 들어감 -->
			<!--	<prop key="/test/aaa">xxx</prop>
					<prop key="/test/bbb">xxx</prop>
			</props>
		</property>
	</bean>
			-->

	<!-- 스프링 내부에 있는 어노테이션 방법으로 핸들러 맵핑과 핸들러 어댑터 기능을 제공함 -->
	<mvc:annotation-driven/>

	<!-- 해당 패키지를 읽어서 @Controller가 있는 클래스를 자동으로 bean으로 등록합니다. include, exclude를 확장시켜 사용이 가능합니다. -->
	<context:component-scan base-package="com.simple.controller"/>

	<!-- 뷰 합성기(뷰리졸버) -->
	<bean class="org.springframework.web.servlet.view.InternalResourceViewResolver">
	<property name="prefix" value="/WEB-INF/views/" />
	<property name="suffix" value=".jsp" />
	</bean>


</beans>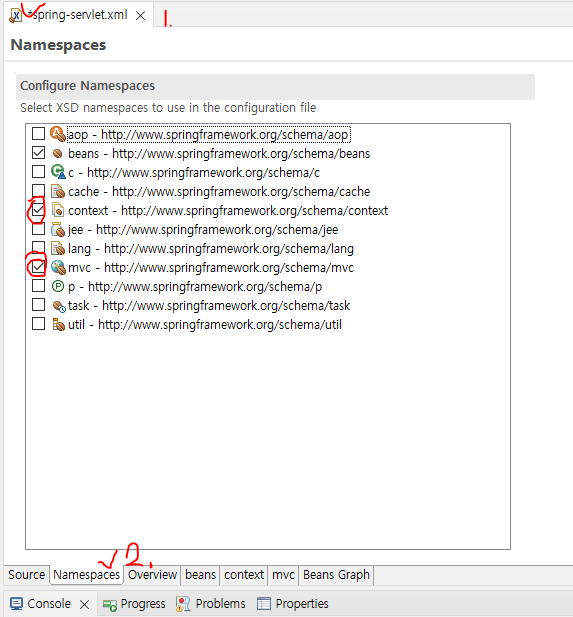
mvc패턴 사용을 위해 namespace설정 후 저장
HomeController.java
package com.simple.controller;

import org.springframework.stereotype.Controller;
import org.springframework.web.bind.annotation.RequestMapping;

@Controller //빈으로 생성할 클래스
public class HomeController {

	@RequestMapping("/test/aaa") //핸들러맵핑
	public String home() {
		return "home";
	}
}
HomeController위에 어노테이션 Controller를 붙인 후, spring-servlet.xml에서 패키지명 넣으면 스프링 설정파일에서 자동으로 빈으로 된다.
맵핑 설정한 주소로 이동하면 간단하게 서버연결을 할 수 있다.
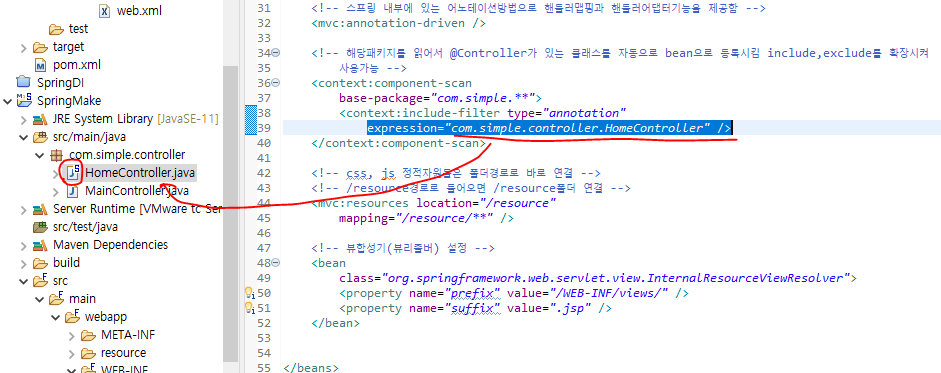
1-2. 서버연결방법 (2)
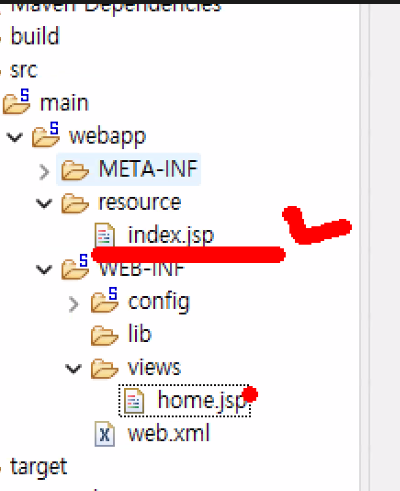
Spring-servlet에 바로 밑에 있는 코드 블럭 추가하고 resource에 index.jsp를 넣으면 index.jsp는 컨트롤러를 타지 않고도 서버에 연결되서 출력됨
<?xml version="1.0" encoding="UTF-8"?>
<beans xmlns="http://www.springframework.org/schema/beans"
	xmlns:xsi="http://www.w3.org/2001/XMLSchema-instance"
	xmlns:mvc="http://www.springframework.org/schema/mvc"
	xmlns:context="http://www.springframework.org/schema/context"
	xsi:schemaLocation="http://www.springframework.org/schema/mvc http://www.springframework.org/schema/mvc/spring-mvc-3.1.xsd
		http://www.springframework.org/schema/beans http://www.springframework.org/schema/beans/spring-beans.xsd
		http://www.springframework.org/schema/context http://www.springframework.org/schema/context/spring-context-3.1.xsd">

	<!-- 디스패처 서블릿이 초기로 등록하는 설정파일 -->


	<!-- 컨트롤러를 종류의 따라 다양하게 만들어 줄 수 있다. -->
	<!-- main컨트롤러를 빈으로 설정 -->
	<!-- <bean id="xxx" class="com.simple.controller.MainController" /> -->

	<!-- 컨트롤러를 맵핑시키는 핸들러 클래스 커스터마이징 -->
	<!-- 핸들러 맵핑 등록 -->
	<!-- /test/aaa 요청이 들어오면 xxx빈으로 핸들러맵핑 -->
	<!-- key에는 url주소가 들어간다. -->
	<!-- <bean class="org.springframework.web.servlet.handler.SimpleUrlHandlerMapping">
		<property name="mappings">
		 <props>
		  <prop key="/test/aaa">xxx</prop>
		   <prop key="/test/bbb">xxx</prop>
		   </props>
		    </property>
		    </bean>
		     -->

	<!-- 스프링 내부에 있는 어노테이션방법으로 핸들러맵핑과 핸들러어댑터기능을 제공함 -->
	<mvc:annotation-driven />

	<!-- 해당패키지를 읽어서 @Controller가 있는 클래스를 자동으로 bean으로 등록시킴 include,exclude를 확장시켜
		사용가능 -->
	<context:component-scan
		base-package="com.simple.**">
		<context:include-filter type="annotation"
			expression="com.simple.controller.HomeController" />
	</context:component-scan>

	<!-- css, js 정적자원들은 폴더경로로 바로 연결 -->
	<!-- /resource경로로 들어오면 /resource폴더 연결 -->
	<mvc:resources location="/resource" mapping="/resource/**" />

	<!-- 뷰합성기(뷰리졸버) 설정 -->
	<bean
		class="org.springframework.web.servlet.view.InternalResourceViewResolver">
		<property name="prefix" value="/WEB-INF/views/" />
		<property name="suffix" value=".jsp" />
	</bean>


</beans>
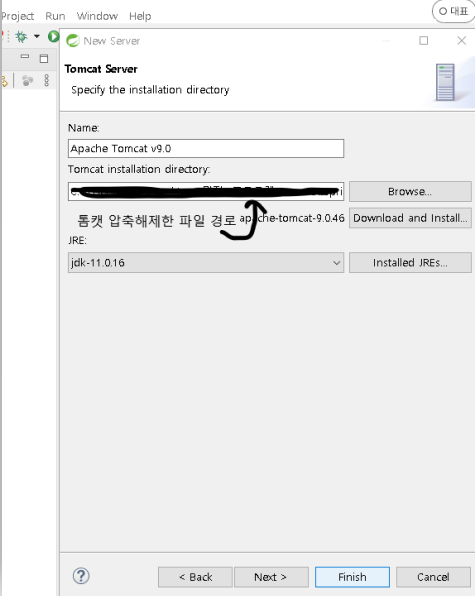
2-1. 톰캣 다운로드
https://tomcat.apache.org/download-90.cgi
Apache Tomcat® - Apache Tomcat 9 Software Downloads
Welcome to the Apache Tomcat® 9.x software download page. This page provides download links for obtaining the latest version of Tomcat 9.0.x software, as well as links to the archives of older releases. Unsure which version you need? Specification version
tomcat.apache.org
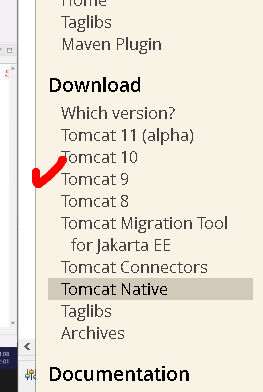
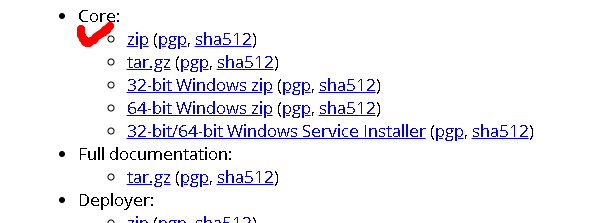
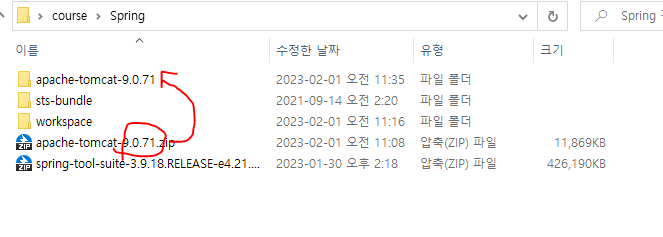
spring 폴더 안에 압축 해제
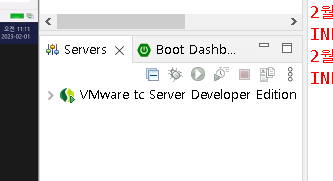
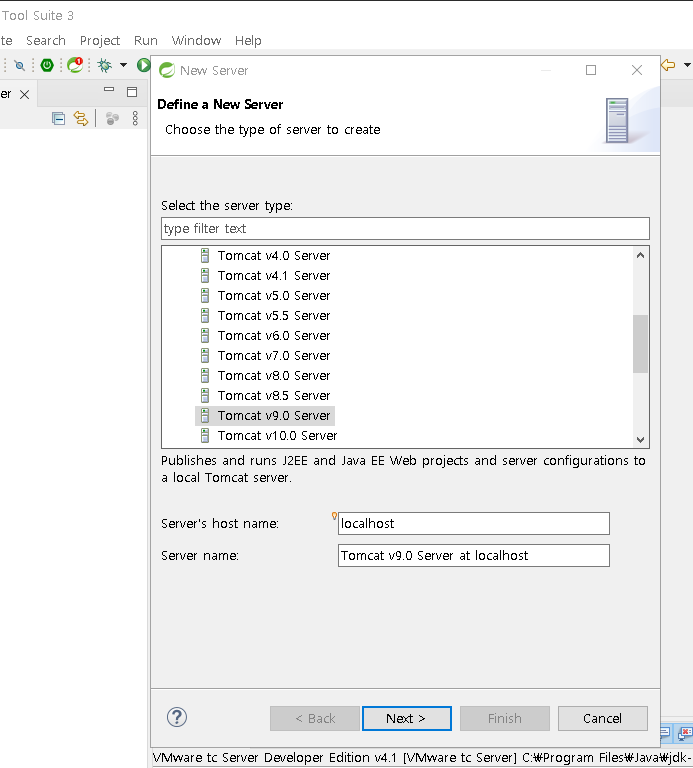
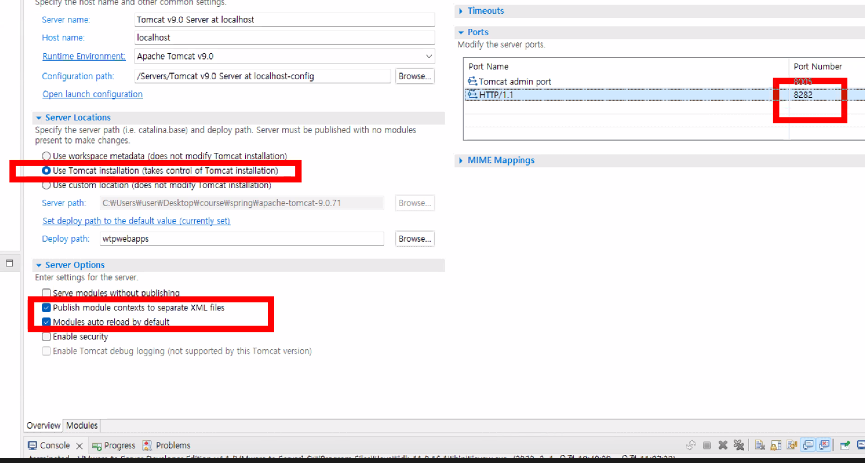
2-2 프로젝트 생성, 톰캣서버 오픈

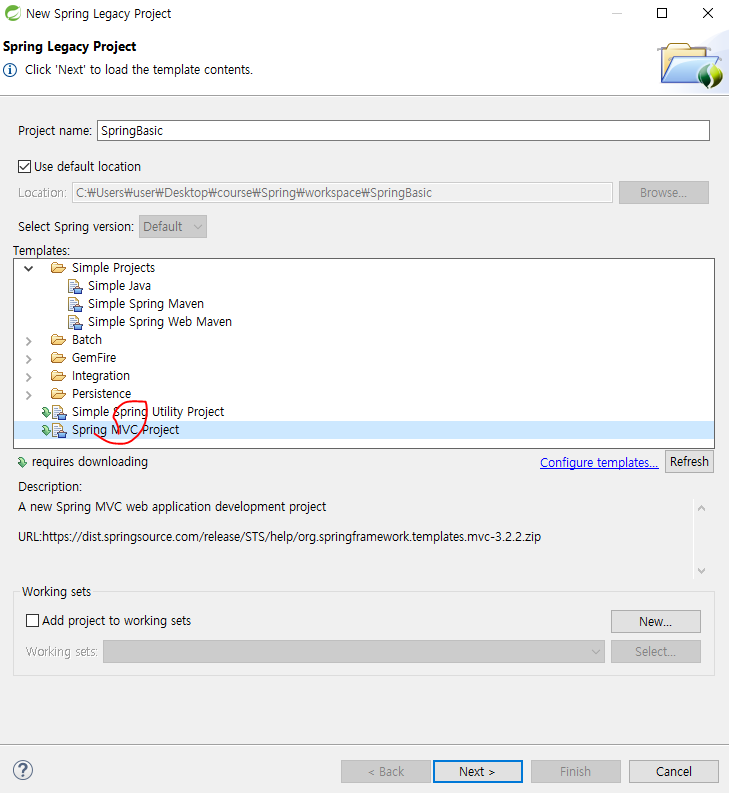
Spring Legacy Project파일 생성
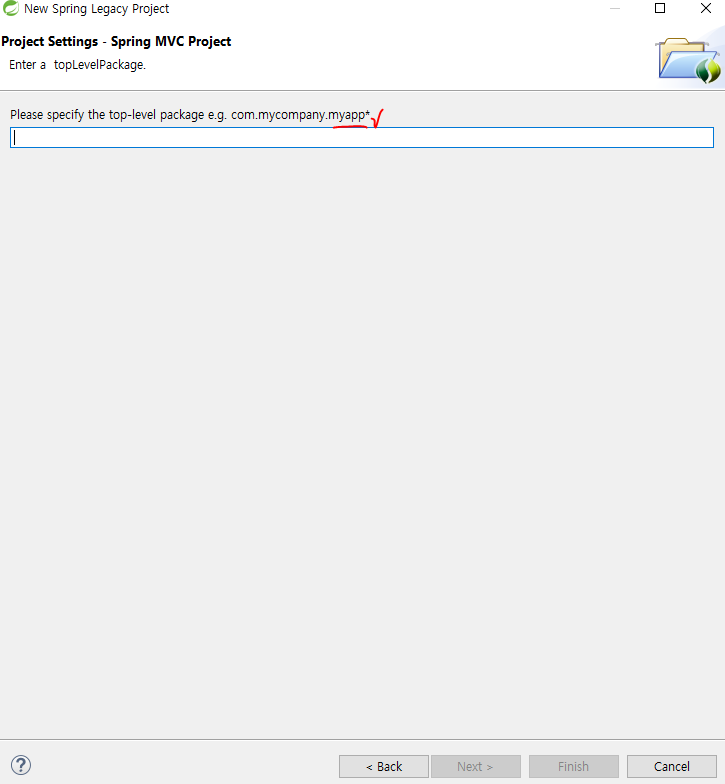
초기에 실행할 패키지명
버전이 낮아서 호환성을 맞추기 위해 바꾸는 작업
* pom.xml(기존은 너무 낮아서 호환성에 맞게 버전 변경해줄 것) 하고나서 maven-update project
https://mvnrepository.com/artifact/javax.servlet/javax.servlet-api/3.1.0
메이븐 업데이트
버전변경완료
<?xml version="1.0" encoding="UTF-8"?>
<project xmlns="http://maven.apache.org/POM/4.0.0"
xmlns:xsi="http://www.w3.org/2001/XMLSchema-instance"
xsi:schemaLocation="http://maven.apache.org/POM/4.0.0 https://maven.apache.org/maven-v4_0_0.xsd">
<modelVersion>4.0.0</modelVersion>
<groupId>com.simple</groupId>
<artifactId>basic</artifactId>
<name>SpringBasic</name>
<packaging>war</packaging>
<version>1.0.0-BUILD-SNAPSHOT</version>
<!-- 컨택스트 패스 변경 - artifactId를 변경, 톰캣의 module에서 변경 -->
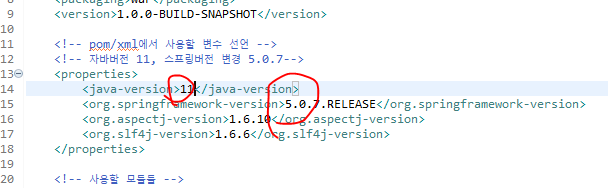
<!-- pom/xml에서 사용할 변수 선언 -->
<!-- 자바버전 11, 스프링버전 변경 5.0.7 -->
<properties>
<java-version>11</java-version>
<org.springframework-version>5.0.7.RELEASE</org.springframework-version>
<org.aspectj-version>1.6.10</org.aspectj-version>
<org.slf4j-version>1.6.6</org.slf4j-version>
</properties>
<!-- 사용할 모듈들 -->
<dependencies>
<!-- Spring -->
<dependency>
<groupId>org.springframework</groupId>
<artifactId>spring-context</artifactId>
<version>${org.springframework-version}</version>
<exclusions>
<!-- Exclude Commons Logging in favor of SLF4j -->
<exclusion>
<groupId>commons-logging</groupId>
<artifactId>commons-logging</artifactId>
</exclusion>
</exclusions>
</dependency>
<dependency>
<groupId>org.springframework</groupId>
<artifactId>spring-webmvc</artifactId>
<version>${org.springframework-version}</version>
</dependency>
<!-- AspectJ -->
<dependency>
<groupId>org.aspectj</groupId>
<artifactId>aspectjrt</artifactId>
<version>${org.aspectj-version}</version>
</dependency>
<!-- Logging -->
<dependency>
<groupId>org.slf4j</groupId>
<artifactId>slf4j-api</artifactId>
<version>${org.slf4j-version}</version>
</dependency>
<dependency>
<groupId>org.slf4j</groupId>
<artifactId>jcl-over-slf4j</artifactId>
<version>${org.slf4j-version}</version>
<scope>runtime</scope>
</dependency>
<dependency>
<groupId>org.slf4j</groupId>
<artifactId>slf4j-log4j12</artifactId>
<version>${org.slf4j-version}</version>
<scope>runtime</scope>
</dependency>
<dependency>
<groupId>log4j</groupId>
<artifactId>log4j</artifactId>
<version>1.2.15</version>
<exclusions>
<exclusion>
<groupId>javax.mail</groupId>
<artifactId>mail</artifactId>
</exclusion>
<exclusion>
<groupId>javax.jms</groupId>
<artifactId>jms</artifactId>
</exclusion>
<exclusion>
<groupId>com.sun.jdmk</groupId>
<artifactId>jmxtools</artifactId>
</exclusion>
<exclusion>
<groupId>com.sun.jmx</groupId>
<artifactId>jmxri</artifactId>
</exclusion>
</exclusions>
<scope>runtime</scope>
</dependency>
<!-- @Inject -->
<dependency>
<groupId>javax.inject</groupId>
<artifactId>javax.inject</artifactId>
<version>1</version>
</dependency>
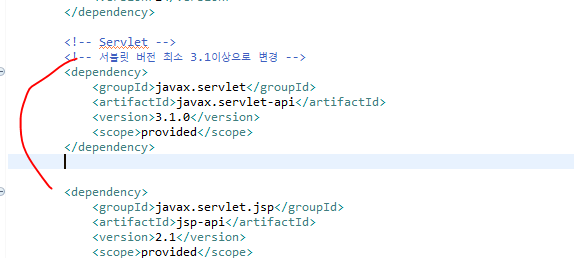
<!-- Servlet -->
<!-- 서블릿 버전 최소 3.1이상으로 변경 -->
<dependency>
<groupId>javax.servlet</groupId>
<artifactId>javax.servlet-api</artifactId>
<version>3.1.0</version>
<scope>provided</scope>
</dependency>
<dependency>
<groupId>javax.servlet.jsp</groupId>
<artifactId>jsp-api</artifactId>
<version>2.1</version>
<scope>provided</scope>
</dependency>
<dependency>
<groupId>javax.servlet</groupId>
<artifactId>jstl</artifactId>
<version>1.2</version>
</dependency>
<!-- Test -->
<dependency>
<groupId>junit</groupId>
<artifactId>junit</artifactId>
<version>4.7</version>
<scope>test</scope>
</dependency>
</dependencies>
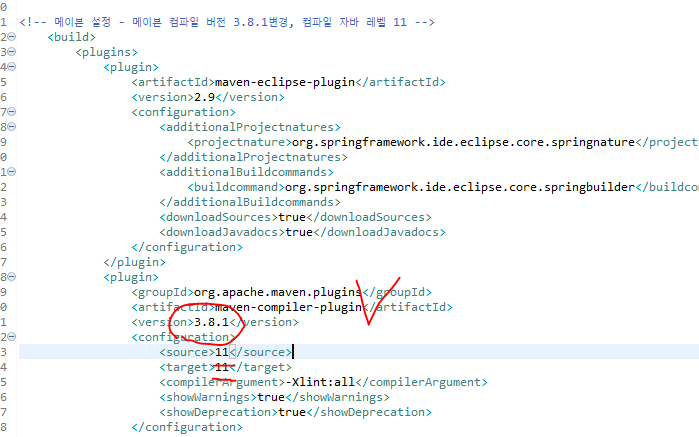
<!-- 메이븐 설정 - 메이븐 컴파일 버전 3.8.1변경, 컴파일 자바 레벨 11 -->
<build>
<plugins>
<plugin>
<artifactId>maven-eclipse-plugin</artifactId>
<version>2.9</version>
<configuration>
<additionalProjectnatures>
<projectnature>org.springframework.ide.eclipse.core.springnature</projectnature>
</additionalProjectnatures>
<additionalBuildcommands>
<buildcommand>org.springframework.ide.eclipse.core.springbuilder</buildcommand>
</additionalBuildcommands>
<downloadSources>true</downloadSources>
<downloadJavadocs>true</downloadJavadocs>
</configuration>
</plugin>
<plugin>
<groupId>org.apache.maven.plugins</groupId>
<artifactId>maven-compiler-plugin</artifactId>
<version>3.8.1</version>
<configuration>
<source>11</source>
<target>11</target>
<compilerArgument>-Xlint:all</compilerArgument>
<showWarnings>true</showWarnings>
<showDeprecation>true</showDeprecation>
</configuration>
</plugin>
<plugin>
<groupId>org.codehaus.mojo</groupId>
<artifactId>exec-maven-plugin</artifactId>
<version>1.2.1</version>
<configuration>
<mainClass>org.test.int1.Main</mainClass>
</configuration>
</plugin>
</plugins>
</build>
</project>
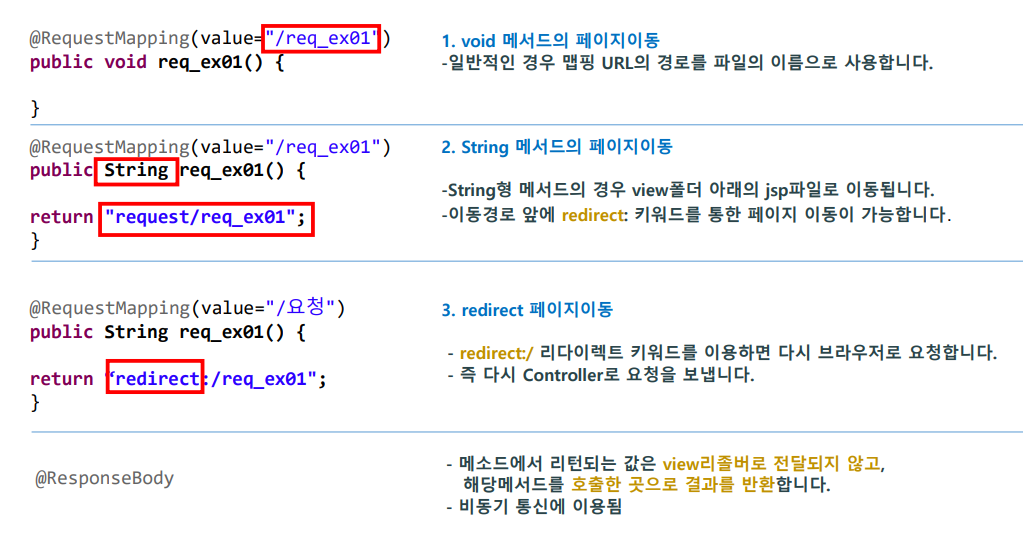
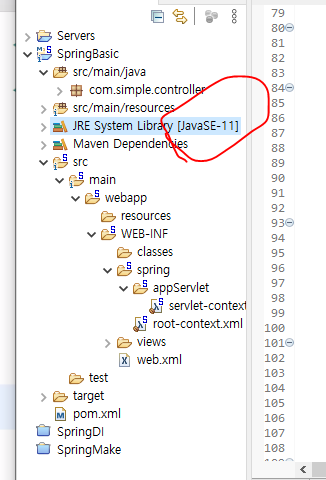
위에 설정 하고 나서 views - home.jsp에서 서버 실행(ctrl + f11)
컨트롤러를 타고 실행되므로 jsp파일을 화면에 구현하기 위해서는 /만 입력해서 파일 불러오기
실행창
2-3 web.xml 수정


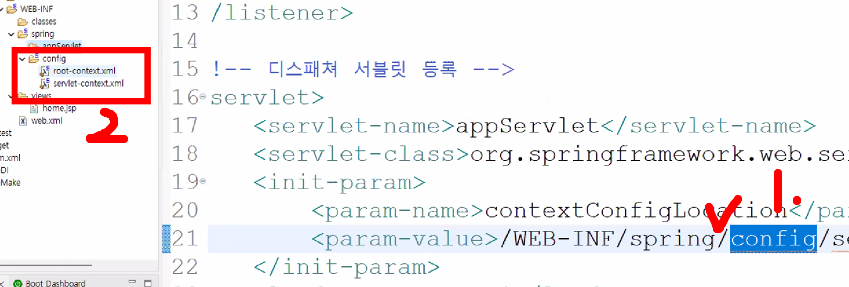
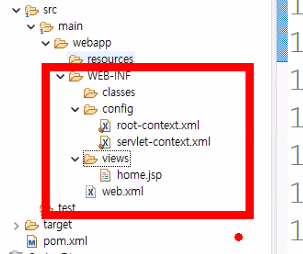
파일경로 설정
web.xml
<?xml version="1.0" encoding="UTF-8"?>
<web-app version="2.5" xmlns="http://java.sun.com/xml/ns/javaee"
xmlns:xsi="http://www.w3.org/2001/XMLSchema-instance"
xsi:schemaLocation="http://java.sun.com/xml/ns/javaee https://java.sun.com/xml/ns/javaee/web-app_2_5.xsd">
<!-- 스프링 전역파일 -->
<context-param>
<param-name>contextConfigLocation</param-name>
<param-value>/WEB-INF/config/root-context.xml</param-value>
</context-param>
<!-- Creates the Spring Container shared by all Servlets and Filters -->
<listener>
<listener-class>org.springframework.web.context.ContextLoaderListener
</listener-class>
</listener>
<!-- 디스패쳐 서블릿 등록 -->
<servlet>
<servlet-name>appServlet</servlet-name>
<servlet-class>org.springframework.web.servlet.DispatcherServlet
</servlet-class>
<init-param>
<param-name>contextConfigLocation</param-name>
<param-value>/WEB-INF/config/servlet-context.xml</param-value>
</init-param>
<load-on-startup>1</load-on-startup>
</servlet>
<servlet-mapping>
<servlet-name>appServlet</servlet-name>
<url-pattern>/</url-pattern>
</servlet-mapping>
<!-- 스프링에서 제공하는 인코딩필터 등록 -->
<!-- 한글처리 필터코드 -->
<filter>
<filter-name>encodingFilter</filter-name>
<filter-class>
org.springframework.web.filter.CharacterEncodingFilter
</filter-class>
<init-param>
<param-name>encoding</param-name>
<param-value>UTF-8</param-value>
</init-param>
<init-param>
<param-name>forceEncoding</param-name>
<param-value>true</param-value>
</init-param>
</filter>
<!-- 위에 지정한 encodingFilter이름을 모든 패턴에 적용 -->
<filter-mapping>
<filter-name>encodingFilter</filter-name>
<url-pattern>/*</url-pattern>
</filter-mapping>
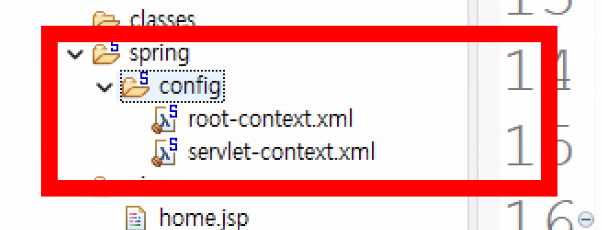
</web-app>2-4 config파일 설정
- servlet-context.xml
<?xml version="1.0" encoding="UTF-8"?>
<beans:beans xmlns="http://www.springframework.org/schema/mvc"
	xmlns:xsi="http://www.w3.org/2001/XMLSchema-instance"
	xmlns:beans="http://www.springframework.org/schema/beans"
	xmlns:context="http://www.springframework.org/schema/context"
	xsi:schemaLocation="http://www.springframework.org/schema/mvc https://www.springframework.org/schema/mvc/spring-mvc.xsd
		http://www.springframework.org/schema/beans https://www.springframework.org/schema/beans/spring-beans.xsd
		http://www.springframework.org/schema/context https://www.springframework.org/schema/context/spring-context.xsd">

	<!-- DispatcherServlet Context: defines this servlet's request-processing infrastructure -->

	<!-- 어노테이션 기능으로 핸들러맵핑, 어뎁터를 구현 -->
	<annotation-driven />

	<!--정적파일 경로 맵핑 -->
	<resources mapping="/resources/**" location="/resources/" />

	<!-- 뷰 리졸버 - 컨트롤러에서 돌아오는 뷰의 경로를 전체경로로변경 -->
	<beans:bean class="org.springframework.web.servlet.view.InternalResourceViewResolver">
		<beans:property name="prefix" value="/WEB-INF/views/" />
		<beans:property name="suffix" value=".jsp" />
	</beans:bean>

	<!-- 패키지를 읽어서 @Controller를 빈으로 생성 -->
	<context:component-scan base-package="com.simple.controller" />


</beans:beans>
homecontroller.java
package com.simple.controller;
import java.text.DateFormat;
import java.util.Date;
import java.util.Locale;
import org.slf4j.Logger;
import org.slf4j.LoggerFactory;
import org.springframework.stereotype.Controller;
import org.springframework.ui.Model;
import org.springframework.web.bind.annotation.RequestMapping;
import org.springframework.web.bind.annotation.RequestMethod;
@Controller //
public class HomeController {
//로그 출력 기능 - 패키지 별로 log4j.xml에 등록
// private static final Logger logger = LoggerFactory.getLogger(HomeController.class);
@RequestMapping(value = "/", method = RequestMethod.GET)
public String home(Locale locale, Model model) {
// logger.info("Welcome home! The client locale is {}.", locale);
return "home";
}
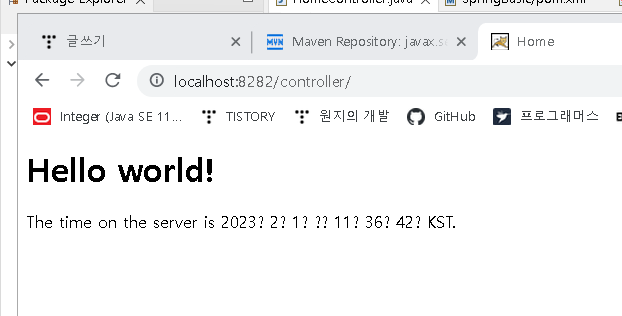
}home.jsp
<%@ taglib uri="http://java.sun.com/jsp/jstl/core" prefix="c" %>
<html>
<head>
	<title>Home</title>
</head>
<body>
<h1>
	Hello world!
</h1>

</body>
</html>
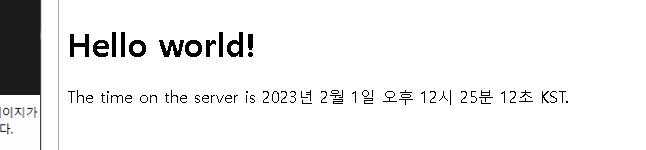
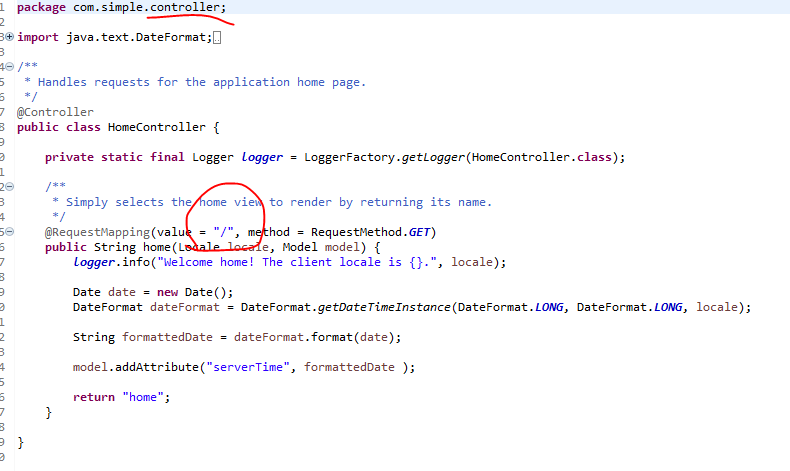
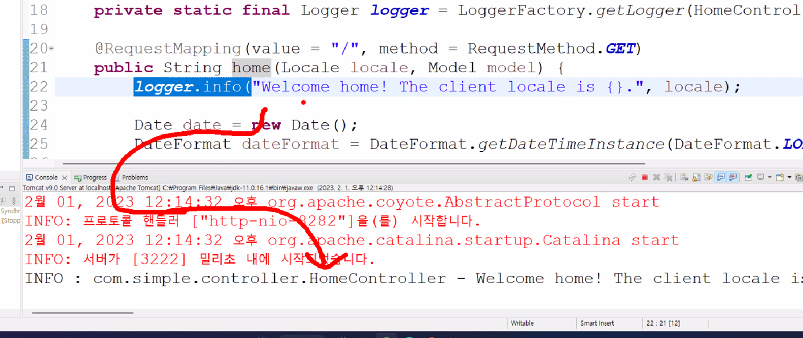
homecontroller-date 객체, home.jsp-server time 설정
package com.simple.controller;

import java.text.DateFormat;
import java.util.Date;
import java.util.Locale;

import org.slf4j.Logger;
import org.slf4j.LoggerFactory;
import org.springframework.stereotype.Controller;
import org.springframework.ui.Model;
import org.springframework.web.bind.annotation.RequestMapping;
import org.springframework.web.bind.annotation.RequestMethod;


@Controller //
public class HomeController {

	//로그 출력 기능 - 패키지 별로 log4j.xml에 등록
//	private static final Logger logger = LoggerFactory.getLogger(HomeController.class);

	@RequestMapping(value = "/", method = RequestMethod.GET)
	public String home(Locale locale, Model model) {
//		logger.info("Welcome home! The client locale is {}.", locale);

		Date date = new Date();
		DateFormat dateFormat = DateFormat.getDateTimeInstance(DateFormat.LONG, DateFormat.LONG, locale);

		String formattedDate = dateFormat.format(date);

		model.addAttribute("serverTime", formattedDate );

		return "home";
	}

}
<%@ taglib uri="http://java.sun.com/jsp/jstl/core" prefix="c" %>
<html>
<head>
<title>Home</title>
</head>
<body>
<h1>
Hello world!
</h1>
<P> The time on the server is ${serverTime}. </P>
</body>
</html>서버실행 결과