Spring 의존 객체 자동주입
의존 객체 자동 주입이란?
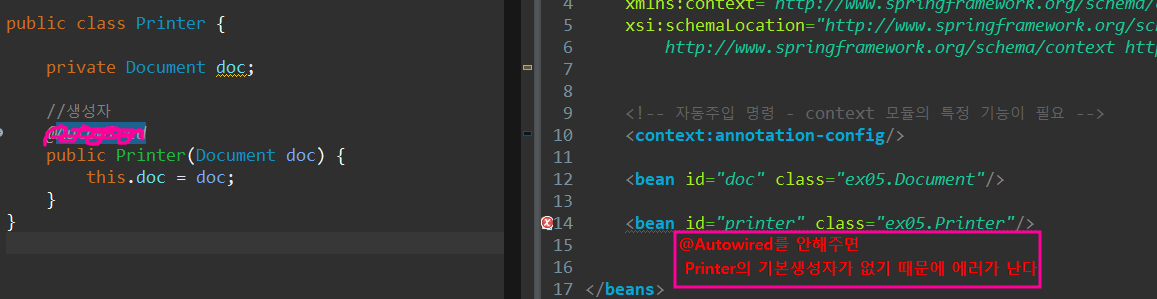
스프링 설정 파일에서 의존 객체를 주입할 때 또는 태그로 의존 대상 객체를 명시하지 않아 도 스프링 컨테이너 가 자동으로 필요한 의존 대상 객체를 찾아서 의존 대상 객체가 필요한 객체에 주입해 주는 기능이다. 구현 방법은 @Autowired와 @Resource 어노테이션을 이용해서 쉽게 구현할 수 있다.
의존객체 자동주입 태그
- @Autowired (required = false)
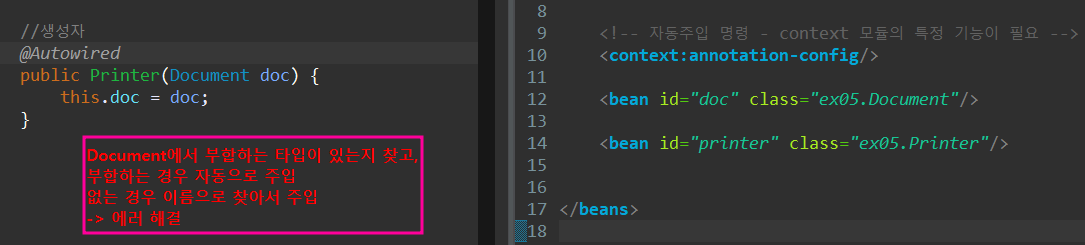
타입을 기준으로 의존성을 주입 ,
같은 타입 빈이 두 개 이상 있을 경우 변수이름으로 빈을 찾음
Spring 아노테이션
- t니까 type으로 먼저 주입한다고 암기
* @Autowired - 타입으로 빈을 주입 -> 없으면 이름으로 찾아서 빈을 주입
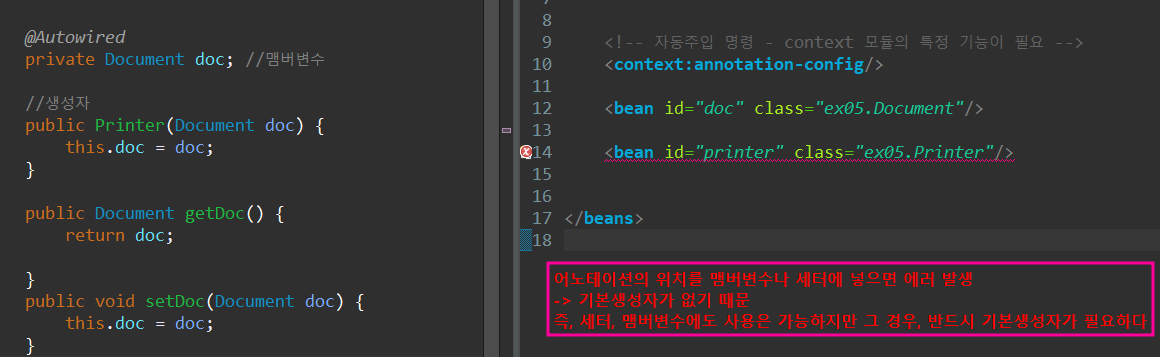
* -> 생성자, setter, 멤버변수에도 사용 가능
- @Qualifier
빈의 이름으로 의존성 주입
@Autowired와 같이 사용
Spring 아노테이션
* @Qualifier - 빈 이름의 강제 연결
* 컨테이너에 동일한 객체가 여러개 있을때 어느 객체를 주입할지 선택해주는 어노테이션
- @Resource
name 을 속성을 이용하여 빈의 이름을 직접 지정
JavaSE 의 아노테이션(JDK9에는 포함 안되 있음 )
- re ,, 이름으로 주입,, 암기
* @resource - 이름으로 빈을 주입 -> 타입으로 빈을 주입
- @Inject
@Autowired 아노테이션을 사용하는 것과 같다
JavaSE 의 아노테이션
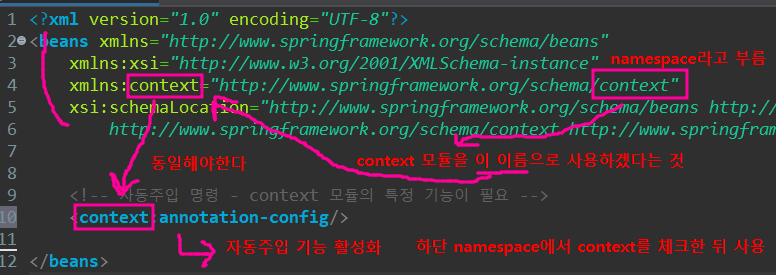
context-xml 파일의 namespace
-xml파일에서 bean을 여러개 써줄 경우


에러메세지
-> No qualifying bean of type 'ex05.Document' available: expected single matching bean but found 2: doc1, doc2
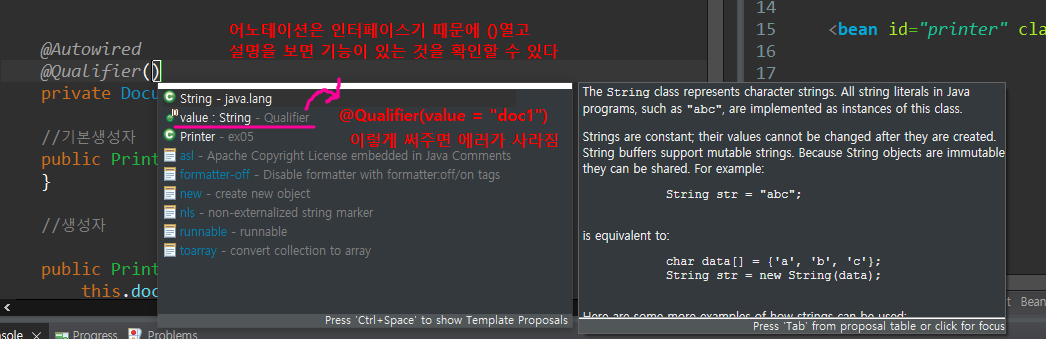
@Qualifier
-> 위의 코드에서는 @Qualifier(value = "doc1") 로 적어주면 에러가 해결된다!
- 실습
-> 문제
//MVC2 방식의 클래스 모형입니다.
//1. Controller에서 new키워드를 사용하지 말고 "자동주입"을 이용해서 Service의 hello를 호출시켜주세요
//2. Service에서는 new키워드를 사용하지 말고 "자동주입"을 이용해서 DAO의 hello를 호출시켜주세요
//3. DAO에 있는 리턴값을 Controller로 반환받고 출력해주세요
//4. main에서는 컨트롤러 객체를 확인
-> DAO의 메서드를 자동주입을 통해서 service에서 가져오고, 그걸 또 Controller에서 갖고와서 출력하라는 문제
-hello-context.xml
<?xml version="1.0" encoding="UTF-8"?>
<beans xmlns="http://www.springframework.org/schema/beans"
	xmlns:xsi="http://www.w3.org/2001/XMLSchema-instance"
	xmlns:context="http://www.springframework.org/schema/context"
	xsi:schemaLocation="http://www.springframework.org/schema/beans http://www.springframework.org/schema/beans/spring-beans.xsd
		http://www.springframework.org/schema/context http://www.springframework.org/schema/context/spring-context-4.3.xsd">

	<context:annotation-config/>

	<bean id="cont" class="ex06.Controller"/>

	<bean id="serv" class="ex06.ServiceImpl"/>

	<bean id="dao" class="ex06.DAO"/>

</beans>
-DAO
package ex06;

public class DAO {

	public String hello() {
		return "hello";
	}
}
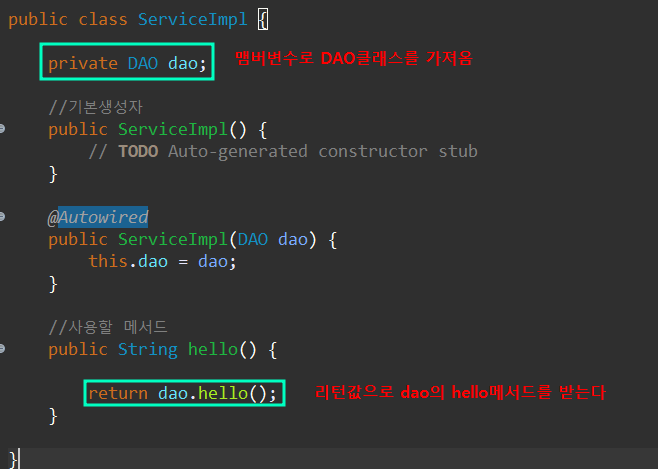
-ServiceImpl
package ex06;

import org.springframework.beans.factory.annotation.Autowired;

public class ServiceImpl {


	private DAO dao;

	//기본생성자
	public ServiceImpl() {
		// TODO Auto-generated constructor stub
	}

	@Autowired
	public ServiceImpl(DAO dao) {
		this.dao = dao;
	}

	//사용할 메서드
	public String hello() {

		return dao.hello();
	}

}
-Controller
package ex06;
import org.springframework.beans.factory.annotation.Autowired;
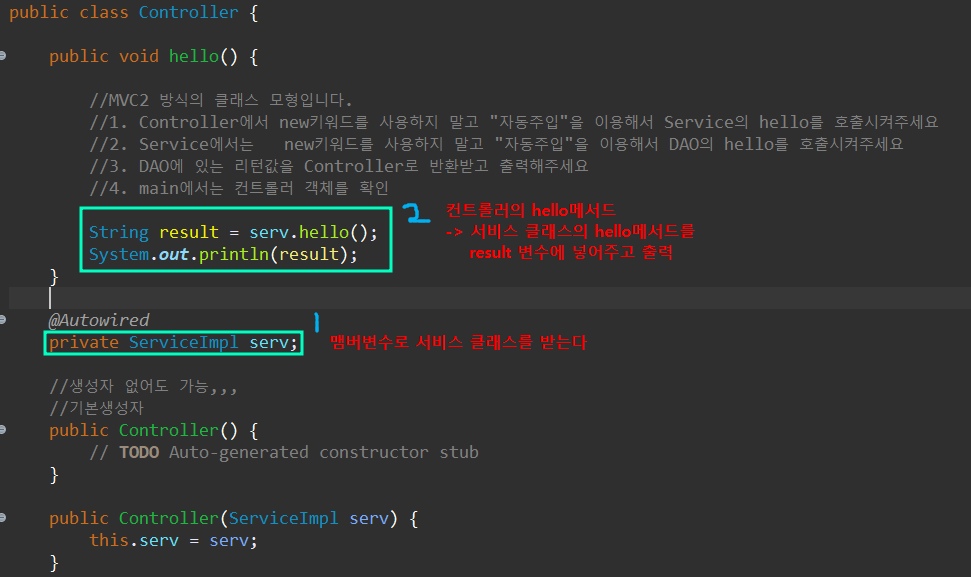
public class Controller {
public void hello() {
//MVC2 방식의 클래스 모형입니다.
//1. Controller에서 new키워드를 사용하지 말고 "자동주입"을 이용해서 Service의 hello를 호출시켜주세요
//2. Service에서는 new키워드를 사용하지 말고 "자동주입"을 이용해서 DAO의 hello를 호출시켜주세요
//3. DAO에 있는 리턴값을 Controller로 반환받고 출력해주세요
//4. main에서는 컨트롤러 객체를 확인
String result = serv.hello();
System.out.println(result);
}
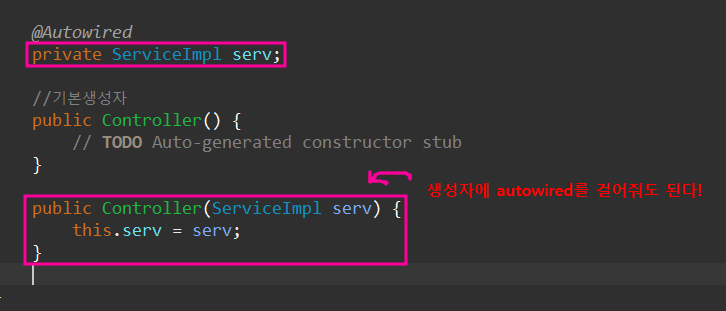
@Autowired
private ServiceImpl serv;
//생성자 없어도 가능,,,
//기본생성자
public Controller() {
// TODO Auto-generated constructor stub
}
public Controller(ServiceImpl serv) {
this.serv = serv;
}
}
-MainClass
package ex06;

import org.springframework.context.support.GenericXmlApplicationContext;

public class MainClass {

	public static void main(String[] args) {

		GenericXmlApplicationContext ctx =
				new GenericXmlApplicationContext("hello-context.xml");

		Controller cont = ctx.getBean("cont", Controller.class);

//		ServiceImpl serv = ctx.getBean("serv", ServiceImpl.class);

		cont.hello();

//		System.out.println(cont.getServ().hello());
//		System.out.println(serv.getDao().hello());
//
	}

}
-ServiceImpl
ServiceImpl
* 맴버변수와 생성자 둘다 어노테이션을 걸어줄 수 있음!
ex)
-Controller
-MainClass
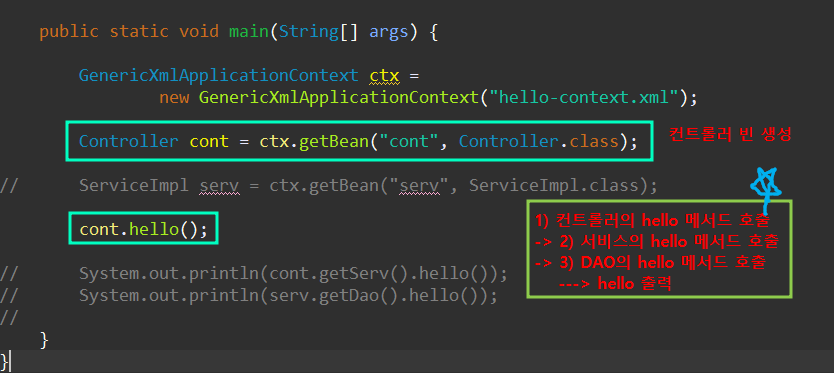
결국 총정리해보면
1) Controller의 hello 메서드 호출
2) ServiceImpl 클래스의 hello메서드 호출
3) DAO의 hello메서드 호출
4) hello 출력
자바코드에서의 어노테이션
@Configuration
- 클래스에 붙는 어노테이션
- xml을 대신해서 설정파일로 사용할 때 쓰는어노테이션
@Bean
- 빈을 생성해줌
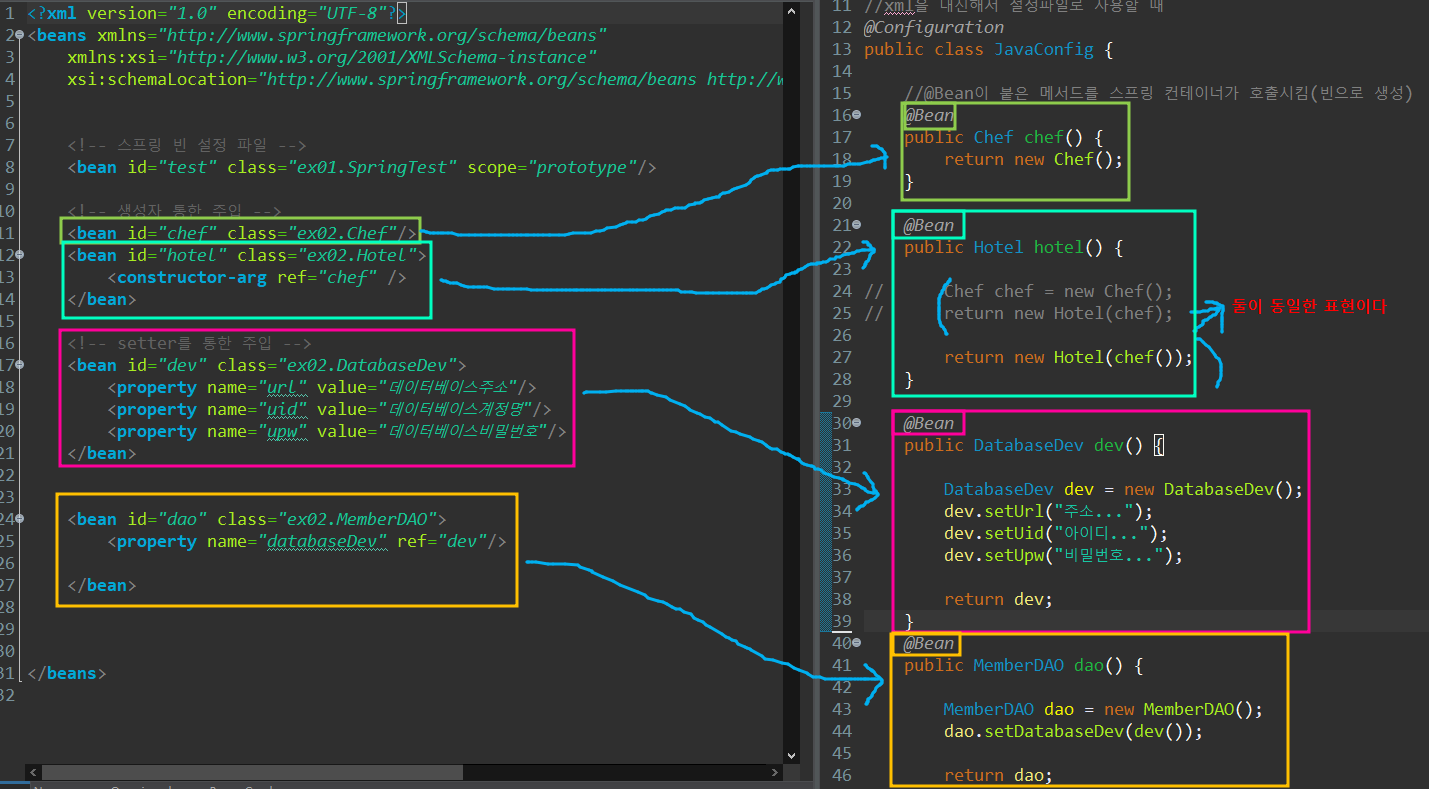
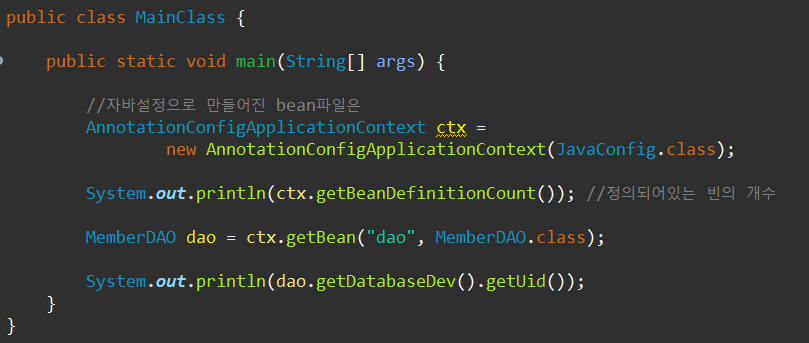
- 자바설정으로 생성된 파일은 AnnotationConfigApplicationContext를 사용한다